Showing posts with label DIY. Show all posts

Monday, November 4, 2013

How to make a wreath of leaves


Sometimes Sundays feel like a "last chance" day. I'm cramming in errands, baking, getting a head start on the work week and catching up on things around the house. And of course, we're supposed to relax and watch movies and generally do nothing in between there as well, right? 

On Saturday, we went on a hike in Auburn along the river and on the way back stopped for lunch at Ikeda's Market. Out front, they were selling these beautiful leaf wreathes for like $15.99 each. I was tempted to buy one, knowing our front door was sullenly bare, but I resisted, listening to that voice that says "you could make that!" ...or the one that shouts "no more spending money this month!" We all know that last voice.

I was out in the front yard yesterday noticing all the beautiful leaves from the neighbor's maple tree that had fallen to the ground. They were just too beautiful to waste....read on to see how to make your own wreath...


Thursday, October 24, 2013

DIY wedding guest (photo) book


I knew I didn't want a traditional guest book for wedding guests to simply write their name on a line like an attendance record. I wanted them to do a little work and to write us something nice and heartfelt or funny we could look back on for years (Andrew and I are both writers, after all). :) But I wasn't into the Jenga pieces, thumbprint trees, river rocks and other off-beat guest books you might see at weddings nowadays. They are awesome and creative, but it was hard for me to imagine them lasting a long time or being displayed after the wedding. I also wanted a way we could keep a small album of our engagement photos. So, I decided to make a photo album that guests could sign...

Thursday, September 5, 2013

The red bookshelf


When Andrew and I moved into our house in Sacramento, we inherited an old bookshelf my parents had in their "to donate/sell/get rid of now that the kids are out of the house" pile. :) It was stained wood and a had a little wear and tear from over the years. So I went on a journey to the bright-chandelier-lit, mega hardware store that is Home Depot and sought out the perfect shade. 

I decided red would make our living room pop. I bought some sandpaper, a paintbrush and a pint of Glidden's "Red Delicious" paint. The guy at the paint counter warned me: don't be surprised if it goes on pink first.

And it did.

I sanded it first, slapped on a rough first coat and polished it off with a more detailed second coat. 


A little tip: When you're buying paint, step outside of the store with your color swatches to see how they look in natural sunlight. You'll be amazed how different color looks compared to under those florescent store lights. 

Another tip: don't forget the underside of the shelfs! I did. Saving that project for another weekend!

And here's the final product... every house should have a red bookshelf, right? :)


Tuesday, October 30, 2012

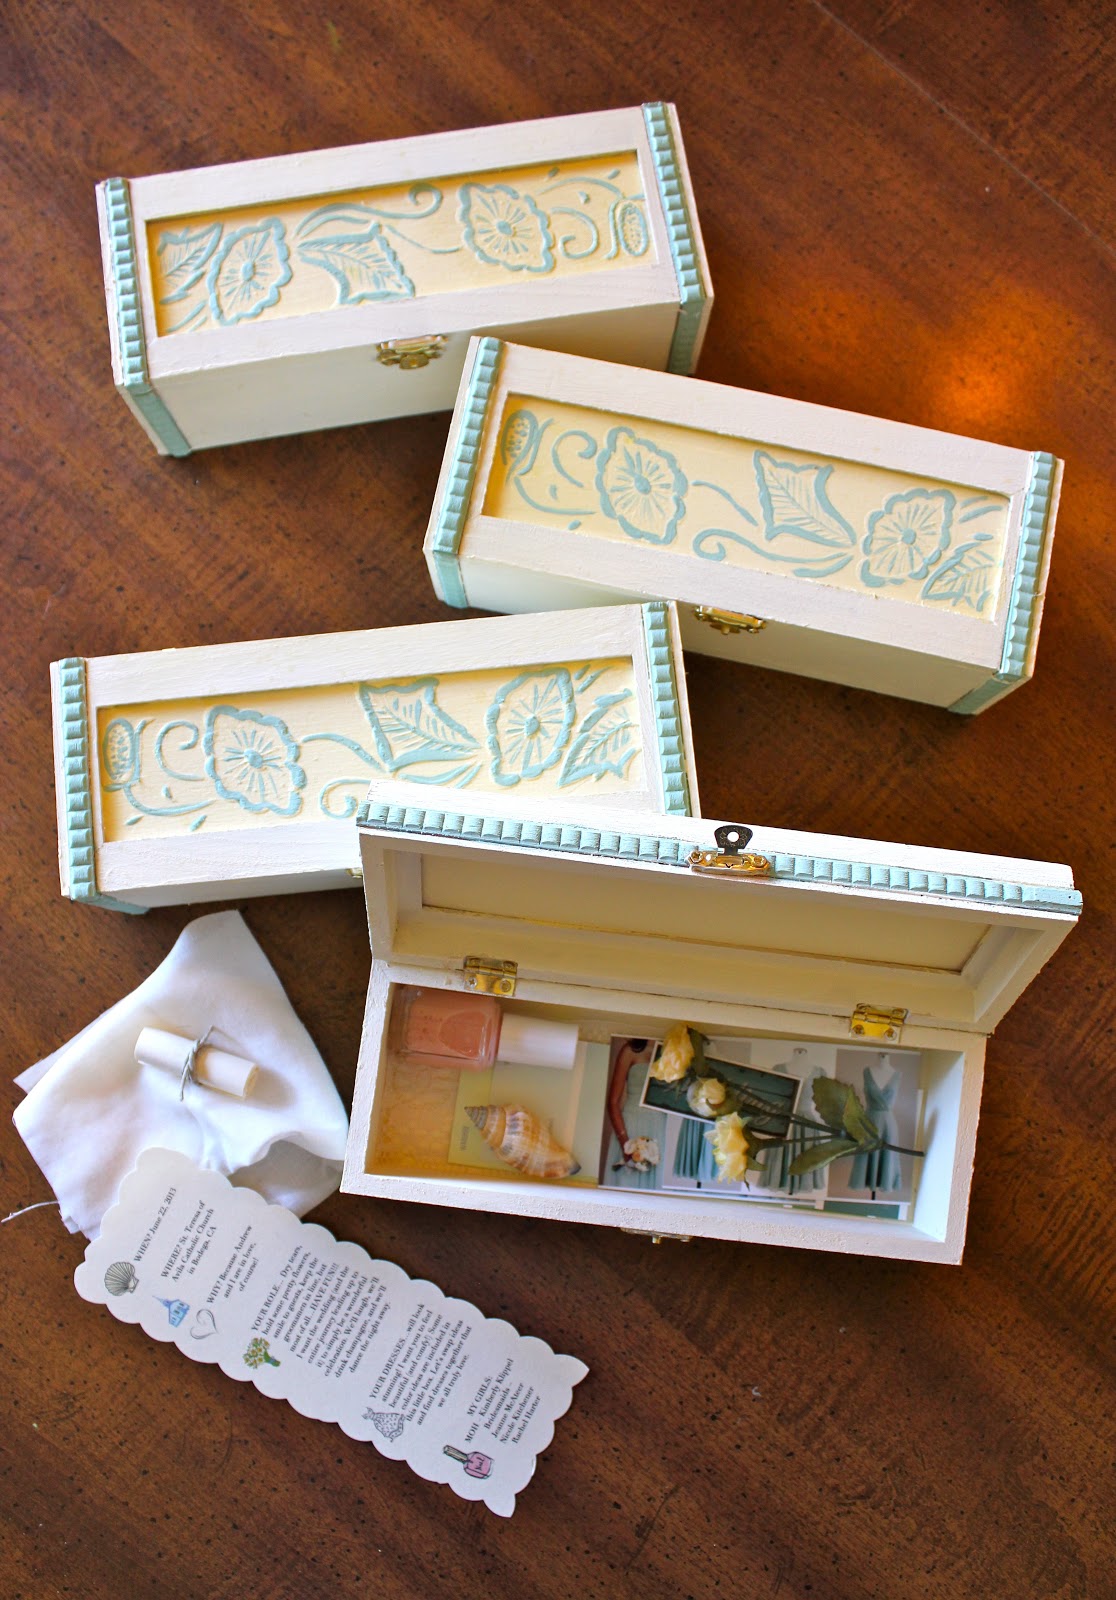
Bridesmaid boxes


As soon as we began planning the wedding, I knew I wanted to ask my bridesmaids in some special way to join me on the "journey to the alter" as I like to call it. We are all scattered around California and across the globe (literally!), so sending a little box seemed like just the ticket. I'd seen a few inspirational ideas for bridesmaids boxes around the web (like these and these beautiful ones) and fell in love with the idea, but I wanted to make them unique with my favorite colors and filled with little treasures made just for my ladies. It was my turn to pop the question, after all!


Here's how they turned out, with a little tutorial on the project...

Saturday, September 8, 2012

Alphabet photography


With more of my friends joining the “Mrs.” circuit, finding wedding presents that are personal and more heartfelt than the usual bath towel or casserole dish registry picks can be a challenge. But anything handmade has always been my idea of a great gift.

So when my friend Nicola married Mark earlier this year, I went back to my photography roots and put together an alphabet frame with their last name, Faires, which fit perfectly into a six-opening photo frame I found on Amazon. Most last names with four, five or six letters will fit into a collage frame for either 4x6 or 5x7 photos, but longer names like Sheldon (now the last name of my friend Emily, who married Jeff back in July) required individual frames.  

Finding the letters was the fun part! I went outside and explored. Anything that looked loopy or curvy or interesting, I captured. A piece of rope became an "R", the legs of an old wooden chair became an "F", like a little scavenger hunt! I printed the photos at CVS (alas, I no longer have access to a darkroom to print film the old fashioned way) and wrote a personalized note on the back of each frame to the couple.

Hopefully, they can be hung up somewhere and serve as a loving reminder of their foundation and new lives together. :)


You can find frames similar to the ones I used HERE and HERE. 

Friday, July 27, 2012

Wicker makeover


Two years ago, I stayed with my aunt in Marina Del Rey while I learned to scuba dive and tried to figure out my post-college life. One day, she entrusted me with a can of leftover turquoise house paint and asked me to make over the little wicker table that sits on her upstairs deck. So, I did, of course!

Wicker is usually found in plain brown or white, but a quick coat of colorful paint makes it pop—and last longer. AND, it's easy.

Step one: Clean off the wicker furniture with a hose or scrub brush.
Step two: Find a little can of paint.
Step three: Paint! Let dry, and set in your favorite outdoor spot.

Simple and cute. :)

(Tip: The little nooks and crannies were difficult to paint with a brush, so if I ever do another wicker project, I’d use spray paint.)